Git Workflow#
We use the Git version control system https://git-scm.com with a central GitHub repository https://github.com/geodynamics/pylith for development.
We will refer to this central repository as the geodynamics/pylith repository.
Only the PyLith maintainers have write access to the geodynamics/pylith repository; everyone else is limited to read access.
Contributions from the community are incorporated into the geodynamics/pylith repository via pull requests.
Currently, the PyLith maintainers use the
Feature Branch Workflow.
Each new feature is added on its own branch, and once it is implemented, tested, and documented, it is merged to the main branch.
If you wish to contribute to PyLith development, then you should follow the Forking Workflow illustrated in Figures git-repositories and git-branch.
You fork the geodynamics/pylith repository so that you have a copy of the repository for your changes.
Each new, independent feature you develop should be done in a separate branch.
Large feature contributions should be broken up into multiple phases, where each phase provides a working version that passes all of its tests.
Each phase corresponds to a separate branch that is merged back into the geodynamics/pylith repository (usually the main branch) via a pull request when it is completed.

Fig. 115 Overview of repositories for the Git forking workflow used in PyLith development.
The main repository is geodynamics/pylith at GitHub.
Developers create a fork of that repository under their own GitHub account (e.g., saradeveloper), which is cloned to their local computer.
Changes and additions to the code are committed to the repository on the local computer, which are pushed to the developer’s GitHub account.
Once a development task is completed, a developer is encouraged to contribute the changes and additions to the main repository via pull requests.#
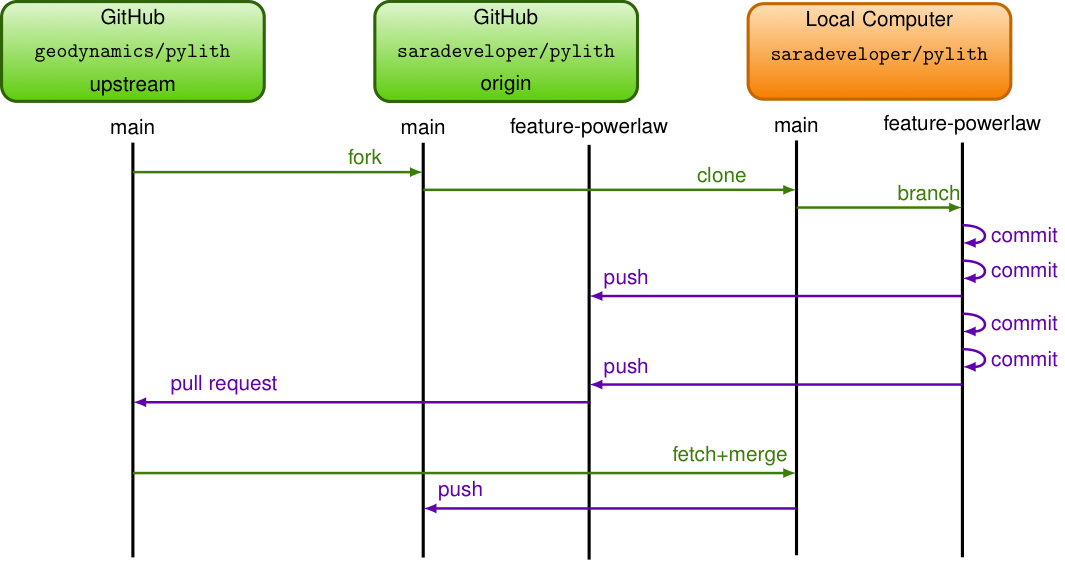
Fig. 116 Overview of repositories and branches for the Git forking workflow used in PyLith development.
From the main branch on your local machine, you create a feature branch, e.g., feature-powerlaw, to complete a single task such as adding a feature, fixing a bug, or making an improvement to the documentation.
You should break up the changes into several steps, which are saved locally as commits.
The commits may be pushed to your repository on GitHub for backup or syncing across multiple computers.
Once the task is completed, you submit a pull request to have the changes merged to the main branch on the community repository.
Once the pull request is merged, you update your own main branch on your local computer from the community repository and then push the changes to your repository on GitHub.#
There are two steps to setting up a copy of the PyLith repository that you can use for development under the Forking Workflow:
Create a GitHub account.
Fork the
geodynamics/pylithrepository.This will create a copy of the PyLith repository in your GitHub account. You can make changes to this copy and, when you are ready to contribute changes back to the
geodynamics/pylithrepository, you will create a pull request.
Tip
We recommend adding your SSH public key to your GitHub account and/or creating a personal access token. See GitHub Docs: Connecting To GitHub with SSH and GitHub Docs: Creating a personal access token for more information. This provides additional security and eliminates the need for you to enter your username and password whenever you push to your repository.
For additional security, consider setting up your GitHub account to use two-factor authentication. See GitHub Docs: Securing your account with two-factor authentication.
We also recommend signing your commits using GPG or S/MIME. See GitHub Docs: Managing commit signature verification for more information.
Keeping Your Fork in Sync with geodyamics/pylith#
See git-branch for the diagram of the workflow associated with these steps.
Set the upstream repository#
For each clone of your fork (each computer with a local copy of your fork), you need to create a link to the “upstream” geodynamics/pylith repository.
This allows you to keep your repository in sync with the community repository.
# List the current remotes for your fork.
git remote -v
# Output
origin git@github.com/YOUR_GITHUB_USERNAME/pylith.git (fetch)
origin git@github.com/YOUR_GITHUB_USERNAME/pylith.git (push)

# Set the link to the remote upstream repository
git remote add upstream https://github.com/geodynamics/pylith.git

# Verify the upstream repository has been added.
git remote -v
# Output:
origin git@github.com/YOUR_GITHUB_USERNAME/pylith.git (fetch)
origin git@github.com/YOUR_GITHUB_USERNAME/pylith.git (push)
upstream https://github.com/geodynamics/pylith.git (fetch)
upstream https://github.com/geodynamics/pylith.git (push)
Updating Your Local Branch To Match The Upstream Repository#
Make sure all of your local changes have been committed or stashed.
If you are updating the main branch or another branch that you know has not been rebased, then you can merge the updates from the upstream (geodynamics/pylith) repository using the following procedure.
Danger
If you do not know whether or not the branch you are updating has been rebased, then do not follow this procedure. Instead, follow the procedure for updating a rebased branch.
# Update your local version of the upstream repository
get fetch upstream

# Check out the 'main' branch
git checkout main

# Merge 'main' from upstream to your local clone.
git merge upstream/main

# If there are no conflicts, push the changes to your fork on GitHub.
git push
Important
The main branch should only be changed using this procedure.
You should never merge your local branches to your main branch or commit local changes to your main branch.
This ensures that your main branch stays in sync with the geodynamics/pylith main branch.
If you need to test integration of multiple feature branches, it is best to create a new branch for that purpose.
# Switch to the `main` branch and delete your local copy of the upstream "project" branch.
git checkout main
git branch -D hackathon/project

# Update your local version of the upstream repository
get fetch upstream

# Checkout the branch again, tracking the upstream repository.
git checkout --track upstream/hackathon/project

# Push the changes to your GitHub repository and have the branch track that repository.
git push --force -u origin hackathon/project
Tip
If you are creating feature branches off of a branch in the geodynamics/pylith repository, then we recommend not pushing that branch to your local repository.
Just have your local branch track the upstream branch using git branch --track upstream/hackathon/project.
You still need to delete this local branch and then check it out again if it is rebased in the upstream repository, but it eliminates the need to push to your GitHub repository.
Creating a New Feature Branch#
Before creating a new feature branch, you should merge updates from the upstream repository as described in Updating Your Local Branch To Match The Upstream Repository.
# Start from the current development branch (usually "main")
git checkout main

# Make sure it is up to date.
git pull

# Create a new branch from 'main', substituting appropriate names for
# USERNAME and BRANCH.
git checkout -b USERNAME/BRANCH

# Examples
git checkout -b saradeveloper/feature-powerlaw-rheology
git checkout -b saradeveloper/fix-fault-output
Tip
If you are implementing a feature that requires a significant amount of code development, we strongly recommend that you break the implementation into pieces that can each be tested, documented, and integrated into the PyLith main branch.
Another approach (equally valid) is to create a series of feature branches implementing the different phases that all get merged into the main feature branch; the main feature branch would then be merged into the main branch via a pull request.
Tip
Feature branches are a great way to experiment with an implementation. You can create a feature branch and if you decide the implementation is headed in the wrong direction, you can simply create a new feature branch from your original starting point and delete the bad feature branch.
Staging, Committing, and Pushing Changes#
The Git add and commit commands are used to stage and commit changes to a branch.
Staging refers to just assembling the list of files to include in a commit.
A commit adds code changes to the current branch along with a message describing the changes.
A commit changes only the current branch on your local machine.
In order to update your GitHub fork you need to push your changes.
See the Git documentation for details about these commands.
There are Git interfaces built into a number of editors and integrated development environments (IDEs), as well as standalone graphical user interfaces to Git.
Tip
Commit messages should explain changes. Keep the first line under 80 characters if possible and include an empty line between the first line and any additional lines that provide more detailed explanations.
The commit messages provide important documentation on why code is changed. Your future self and your fellow developers will appreciate good explanations of all changes.
Warning
If you have multiple branches, make sure you are on the correct branch before making commits.
Keeping a feature branch in sync with branch main#
The PyLith main branch may change while you are working on a feature branch.
In some cases it might be a new feature that you do not need and does not affect your work, in which case it does not matter whether you incorporate those changes into your feature branch.
However, in other cases, there might be an important bugfix or feature that you want to integrate into your feature branch while you are working on it.
The recommended way to incorporate these changes is to rebase your feature branch relative to the PyLith main branch.
Rebasing essentially replays your commits on top of the commits in the other branch. With interactive rebasing, you can also rewrite the commit history of a feature branch by reordering, dropping, and/pr combining (squashing) commits. See Git: Rewriting History for more information.
Danger
Rebasing and force pushing can irreversible damage to your repository. We recommend practicing rebasing using a toy repository before attempting to rebase with real code.
The primary steps to rebasing with respect to the PyLith main branch are:
Commit or stash any changes so that you do not have any modified files.
Start the interactive rebasing by running
git rebase -i main.Edit the commit history as desired.
Fix any conflicts during the rebase.
Verify the rebase is correct by running tests, etc.
Force push the branch using
git push --force.
Danger
After you have rebased, running git status will report something like:
On branch saradeveloper/my-great-new-feature
Your branch and 'origin/saradeveloper/my-great-new-feature' have diverged,
and have 56 and 16 different commits each, respectively.
  (use "git pull" to merge the remote branch into yours)
Do not run git pull!
This is one of the few times that you should not do what git suggests.
Doing so will try to merge your original history into your new one.
Instead, you should verify that the new commit history is correct and then do a force push by running git push --force.
Tip
If anytime during the rebasing process, you make a mistake or decide you want to abort the rebasing process, simple run git rebase --abort.
This will return the repository to the state immediately before the rebasing process.
Making Pull Requests#
Once you have completed implementing, testing, and documenting a new feature on a branch in your fork and wish to contribute it back to the geodynamics/pylith repository, you open a pull request. See GitHub Docs: About pull requests for more information.
Tip
To become familiar with making pull requests, we recommend starting with a small, simple change. This may be as little as fixing a typo in the documentation or a comment. Create a feature branch for the change, push it to your repository, and then make a pull request.
Adding Remotes For Accessing Other PyLith Forks#
When collaborating with other people working on PyLith, it is helpful to be able to checkout branches from their forks. You can add their fork as an additional “remote” repository.
# Add remote
git remote add NAME https://github.com/GITHUB_USERNAME/pylith.git
# Example:
git remote add saradeveloper https://github.com/saradeveloper/pylith.git

# Show remotes
git remote -v

# Fetch the information for the remote
git fetch NAME
# Example:
git fetch saradeveloper

# Checkout remote branch
git checkout -b saradeveloper/feature-powerlaw-rheology

# Push to remote branch (requires write access)
git push NAME BRANCH
# Example:
git push saradeveloper feature-powerlaw-rheology